The sheer feature density of fitness watches these days is astounding, and the Garmin Instinct is no exception. It may be small, but it’s capable of, well… how much time have you got?
In light of this, it can feel at first as if you’re wearing a NASA supercomputer on your wrist, which is intimidating to say the least. It may be called “Instinct”, but you’ll need more than those to operate such a deep device.
But don’t let this nifty bit of wrist-candy defeat you! I’ve put together this brief yet informative user guide for the Garmin Instinct so that you can familiarize yourself with the basics, and use this amazing watch to its full potential!
Let’s get to it!!!
Interface And Controls
Garmin Instinct

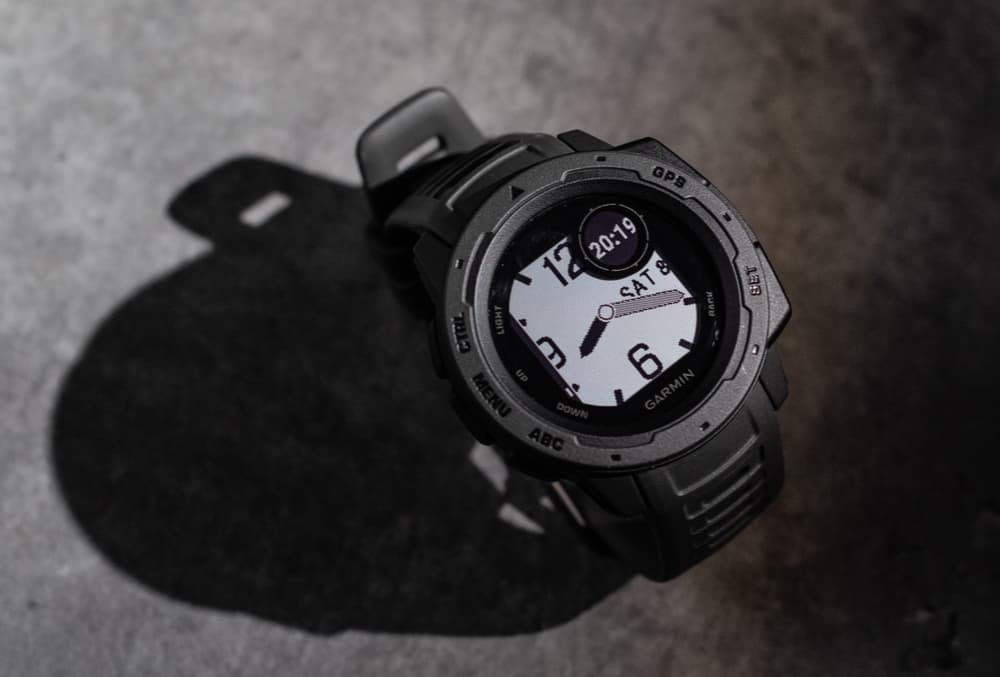
Thankfully, the Garmin Instinct has a very intuitive primary interface made up of 5 key bits of data.
Out of the box, these include Altitude (top left), Date (top right), Time (middle), Sunset/Sunrise Time (bottom left), and Battery Reserve (bottom right).
However, you can customize the primary interface to suit your needs.
For instance, if you’d like it to display your heart rate in the top-right corner, and move the date to the bottom of the unit, you can do so (I’ll tell you how in just a minute).
Read later – Garmin Instinct 1 vs 2 comparison
In terms of controls, you’ll notice five little buttons around the perimeter of the watch, labeled:
- GPS (top right) — View GPS coordinates/save your location. When menu-diving, this button also acts as a selector.
- SET (bottom right) — Opens clock menu so you can adjust time and date.
- ABC (bottom left) — Opens altimeter/barometer/compass page.
- MENU (middle left) — Opens a Settings menu for fine-tuning widgets.
- CTRL (top left) — Opens the Controls menu. When held for an extended period of time, CTRL turns the Instinct on or off.
These are the primary functions of the buttons.
To use the primary function, press and hold the corresponding button. You’ll also notice that four of these five buttons have an additional label printed on the watch face:
- BACK (SET) — Allows you to return to widget list after menu-diving.
- DOWN (ABC) — Navigate widgets and menus.
- UP (MENU) — Navigate widgets and menus.
- LIGHT (CTRL) — Turns on backlight.
These are the secondary functions of your buttons.
To use a secondary function, simply press and release the corresponding button as you normally would.
The GPS button also has a secondary function, despite not being labeled with one. Pressing this button will open your activity list and allow you to start and stop activities.
My comparison – Garmin Venu 2 vs Instinct 2
Editing Menu Interface/Widgets

One of the best things about the Garmin Instinct is the customizable parameters. As well as the home display, there are numerous widgets you can navigate with the UP/DOWN secondary functions, and you can modify them to suit your preferences by…
- Heading to the widget in question.
- Holding the MENU button down for a couple of seconds.
- Use the UP/DOWN buttons to navigate your options.
- Press and release the GPS/Activity/Selector button.
Using this method, you can…
- Fine-tune the layout of the home display.
- Remove widgets
- Add widgets
- Reorder widgets
- Check widget history
Take a look – Garmin Instinct vs Forerunner Comparison
The Control Menu
The Control menu, accessed by pressing and holding the CTRL button, is essentially just another way of displaying your widgets.
Rather than addressing them individually by pressing UP or DOWN, all your widgets are displayed in a ring.
To modify the controls in this menu, simply hold down the MENU button as you did earlier, then scroll through your options using the UP/DOWN buttons.
The Activities Menu
The Activities menu is a list of, you’ve guessed it… activities, e.g. running, cycling, MBT (mountain biking), etc. There are a plethora of activities to choose from, so no matter what you’re into, you can always track your performance.
To choose which activities show up on your Activities list, rinse and repeat the method used for editing the Controls and widgets menu.
Which one is for you? Garmin Instinct 2 vs Fenix 7
Charging Your Garmin Instinct
Charging your instinct after a long day of adventuring or a monster workout session couldn’t be easier.
Simply plug the small end of the included USB cable into the port on the underside of the watch, then plug the larger end into a USB charging port. This could be a wall outlet or a computer, it doesn’t matter.

Garmin advises you to charge the battery to 100%, but lithium-ion batteries don’t enjoy overcharge, so unplugging the watch shortly thereafter is recommended.
Pro-Tip — The Garmin Instinct boasts a military-grade construction, ensuring it can handle the rigors of a life lived on the edge; however, before charging, ensure the port is clean and the area and watch itself are dry.
How To Pair Your Garmin Instinct With Your Smartphone
To truly unlock the Instinct’s potential, you’ll need to connect it to your smartphone, but don’t worry, it’s super easy! Here’s how it’s done…
- Head to the App store, search for Garmin Connect, and download it.
- Open the Garmin Connect app.
- Hold your Instinct within 33 ft (10 m) of your smartphone.
- Turn on your Garmin Instinct by holding down the CTRL button.
- If this is the first time turning on your Garmin Instinct, it will automatically be in pairing mode. To trigger pairing mode manually, simply hold down MENU, use the navigation buttons to reach “Settings”, press the GPS button to select it, then use the GPS button once more to select “Pair Phone”.
- Follow the on-screen instructions if this is the first time you’ve connected a device with Garmin Connect. If this isn’t your first rodeo, in the app, select “Garmin Devices”, then “Add Device” and follow the instructions.
How To Update Garmin Instinct Firmware
Every now and again, Garmin releases a firmware patch for certain products to add or improve existing functionality. To make sure you’re ready to receive these free upgrades, you should…
- Download Garmin Express on your computer.
- Wait for a notification from Garmin telling you there’s an update available.
- Open Garmin Express and follow the on-screen instructions.
Setting Up Your User Profile
In order to calculate accurate data, your Instinct needs to know a few basic things about you, such as your age, weight, height, and gender.
To log this info, turn on your watch, hold the MENU button, select “Settings” > “User Profile”, then enter your details in the corresponding fields.
My comparison – Garmin Vivoactive 3 vs Garmin Vivoactive 4
Activating GPS For Outdoor Activities
As mentioned earlier, you can curate a list of your favorite activities using the GPS button’s secondary function, but if you plan on enjoying an outdoor activity in which your location is key, such as, say, hiking, you’ll need to establish the GPS link before heading into the wild.
This is done by selecting your activity (using the navigation and GPS buttons) and heading to an outdoor area with a clear shot straight up into the sky. Give it a few moments, and you should notice your Instinct logging your location.
Adding Custom Activities
Garmin provides tons of pre-set activities to choose from, but if you’re into something rather obscure, no problem, as you can create custom activities. To get the ball rolling on this front…
- From the home display, press the GPS button.
- Use the same button to select “Add”.
- Select “Copy Activity” to use one of your established activities as a baseline for your new one, or, select “Other” in order to make one from scratch.
- If applicable, select an “Activity Type”.
- Name your activity. Duplicates will be given a number to avoid confusion.
- Follow on-screen instructions to customize activity data screen/auto features.
- Once complete, select “Done” to create the custom activity.
- Then select “Yes” to add it to your Activity list.
Starting/Stopping Activities
You can start an activity simply by finding it in your activities list and pressing the GPS button. You’ll then be given the following options:
- Resume — To continue where you left off.
- Save > Done — To save activity and head back to standard watch mode.
- Resume Later — To continue where you left off at a later date.
- Lap — Will log your lap time and count.
- Back to Start > TracBack — To guide you to the starting point of your activity.
How To Set Up Sleep Tracking
To monitor things such as sleep hours, levels, and movements, you’ll have to log your regular sleeping hours into the “User Settings” of your Garmin Connect account.
Creating A Virtual Partner
If you’re a very competition-based exerciser, you can create a virtual opponent by…
- Holding the MENU button.
- “Settings” > “Activities and Apps”
- Choose an activity.
- Head into the settings menu of the activity.
- “Data Screens” > “Add” > “Virtual Partner”
- Give your virtual partner a pace/speed value.
- Select location of VP widget.
- Use VP widget to assess who is winning.
Setting Training Targets
You can also use your Garmin to set yourself training targets by…
- Pressing the GPS button.
- Choosing your activity.
- Pressing and holding the MENU button.
- “Training” > “Set a Target”.
- Select “Distance Only”, “Distance and Time”, or “Distance and Pace/Speed”, then enter your training goals.
Final Thoughts
We’ve only really scratched the surface of the Garmin Instinct here today, but these are all the essentials you’ll need to dig deeper into this amazing device and use it to become the best possible version of yourself.
Now get out there and get that heart pumping!